Tuesday, February 18, 2014

2014 Project Life {WEEK 7}

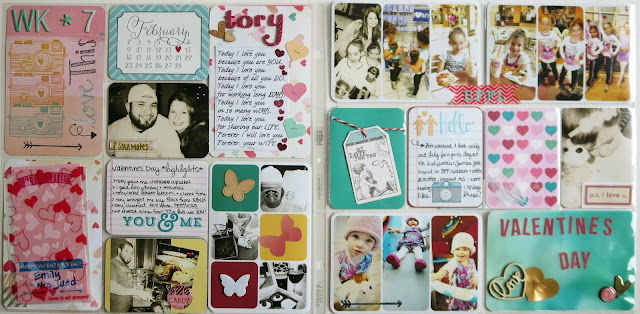
This week I did a 2 page spread because two big things happened and I wanted enough room to showcase both events clearly. Firstly, it was Valentines Day, and secondly, Emily had a 2 night sleepover with her BFF Lily. I took the girls for a fun girls day out to the mall as part of Emily's Valentine's gift.


I decided to use stamping a few times in this spread since I have a few new Amy Tangerine ones that I haven't used yet. I just wanted to add a bunch of cute things to this weeks spread. I hand-wrote the "Love This" on the title card because I didn't know what else to put there! But I like it!


I used more Amy Tangerine stamps at the top of this journal card. LOVE! I used a tag from my Gossamer Blue Feb kit and some red and white twine and tied it to the card for a fun pop on this page. Another secret? I often print 3x4" cards on 4x6" photos by putting two photos together in PicMonkey (yes I have mentioned that a lot), but I also print color tiles via PicMonkey. I used three colors from this page and put three tiles on one of the collage prints. Then I made 3x4" tiles in the same color using the same technique that I use to print photos. This is the blue tile card in action!


I purposely made a Valentines Day card for my husband in 4x6" size to use in my album this week. Supplies included: Pink glittery Thickers, tiny staples, pink hearts punched from paint chips from the store, a small poem printed in 3x4" size, cork and veneer hearts. This only took me 10 minutes to make and I was happy to not have spent $5 on a card I would only semi-like from the store (but SHUSHHH don't tell him that!!)


I used collages across 2 connecting pockets to create a large collage of 6 photos total. This showcased our day at the mall. To make it even more apparent that these 2 pockets are linked, I split the center photo of the girls eating between the 2 pockets AND I added a strip of washi tape over the two pockets to "join" them. I finished by embellishing the washi with "BFFL" alpha.


Using a 1" circle punch and a pack of epoxy stickers from Hobby Lobby (only $3 for 24 of these, or cheaper with coupon) I punched a few circles from a candy bar one of the moms from our Girl Scout troop gave me for Valentine's Day. I am HUGE on including small "flair" type things that are meaningful from my life. I found that punching/creating my own flair from things like this is a fun (and cheap) way to personalize my album in a meaningful way! I used one of these in this weeks spread. Can you find it?


{WEEK 7}

Monday, February 10, 2014

Nowhere to craft but HERE (how the kids craft in the diningroom SUCCESSFULLY)

Several rooms in my home MUST function in more than one way. Previously, I blogged about my craft space or "crafting behind the couch," where I shared how I took a small wall in my livingroom and created a functional craft space clearly separated from the livingroom. Today I will show you where my kids get to craft. Our home only has one family room/livingroom area, one small dining area, and just enough bedrooms for us all to sleep. We do not have a playroom or spare room anywhere in our house to do crafts or play. My solution was to use all the wall space in the home for shelves, shelves, shelves. In the dining room I put a buffet/kitchen island/sideboard/"whatever its called" in between the kitchen counter and our dishes hutch. Originally this was used to store junk, random rags and dishes, and knick knacks. I really wasn't using it well, and at the time I had my kids crafts in huge boxes under my desk. It was difficult to get to, to keep organized, and to clean up, so I never wanted to get the crafts out even though Emily LIVES to craft. This random storage thing would end becoming the PERFECT craft station for my kids. The drawers are large enough to hold cups of organized smaller items such as beads and pom pom balls. The dual layer of shelves allows me to store all the paper, paints, and awkward shaped crafty items in organized, labeled boxes. And the top, well that holds all the many, many books and kits and projects we could ever dream of having out. It is SO much easier for Emily to get to all her projects with them out on display, rather than digging them out of boxes and bags. All her educational books, Girl Scouts projects, American Girl projects, and activity books fit. Ashlyn's legoes, leapster, and other toddler aged toys that I want kept out of her reach also fit well up there.


This is the craft center, which fits well between the dish hutch and the kitchen counter.


The drawers are spacious enough to allow me to organize to fit my needs.


I found these yellow cups at Ikea. They are just the right height for the drawers and are used to sort pom poms and other small multi-use crafty items.


This spinning organizer from Michaels Craft Store ended up being the perfect addition to our craft center, making it very easy to transfer to the diningroom table for the kids to use, and it holds all their markers, colored pencils, scissors, paint brushes, and crayons. The crayons are on a collapsing Crayola tower which fits on top of this storage unit perfectly! Under the crayons is where we keep the glue.


I also display the kids art on the wall above their craft area using Ikea curtain wire.


A closeup of the craft center.


The craft center storage unit, the storage boxes, and the the curtain wire (for displaying art) are all products from Ikea.

The white spinning storage unit and the storage unit with 4 shelves on top of the craft center are both from Michaels Craft Store.

2014 Project Life {WEEK 6}

This week I got my first ever Life Pages kit from Gossamer Blue, a monthly kit club with VERY cute cards and embellishments that coordinate well with eachother. Since February started this week, and its the month of LOVE, I wanted to do a page using a lot of reds and pinks. I pulled a few favorites from this months kit, and added in things from my stash. I didn't end up using everything I had pulled, but I am very happy with the final result. Again, my process for weekly pages is to just pick a color or card you like and go with it. Create a pile of cards and embellishments you WANT to use, and just work them in however you like as you go along. If you end up not happy with something, just change it up! Add a few more random embellishments, or cut a photo out and glue it on a journaling card to add dimension.


This is the pile I created of red and pink, all inspired by the fun cards and embellishments from this months Gossamer Blue Life Pages Kit.


I layered 2 of the cards from the Life Pages Kit to create my title card, and added some glittery Thickers.


I really liked this vellum card from the Life Pages kit, but it was hard to see writing on it, so I added a red label with journaling, then embellished it with a cute heart also from this months kit.


{WEEK 6}

I am really happy I subscribed to this kit, and plan to continue my subscription. You can get your kit subscription HERE.

Tuesday, February 4, 2014

2014 Project Life {WEEK 5 + TECHNIQUES}

My Project Life collection of cards and embellishments is a wide assortment of EVERYTHING. I do not like using the same cards or same embellishments too much within a few weeks or even months. With that said, each week when I sit down and create my weeky page (note I do a whole week in ONE page on average by using collages, you can find that tutorial HERE) I look at what I did in the past couple weeks, look at my stuff, and pick stuff that doesn't look like the stuff I recently did. This week, for example, I ended up choosing brown/tan tones for the page, and like most pages, I added cork and veneer accents. I also like to mix up the techniques, so I tried using a 4x6" photo across 2 3x4" pockets. I am also partial to including ephemera from the week in some small way if possible. I was able to include a ticket from Chuck-E-Cheese and a pink glitery heart from The Creativity Place where the girls made their Valentines. This week I want to show you my "process" so you can get an idea of just how UNPLANNED my pages are. I don't think you have to spend a ton of time or thought to make a pretty page. It takes me about 1.5-2 hours per week to create my weekly pages.

STEP 1: EDIT AND PRINT PHOTOS (1 hour)
I think about what I want to do digitally first. I edit the photos in Photoshop Elements 9 and make collages in PicMonkey online. This week I wanted to add layers, so I used PicMonkey to make small photos (about 2 x 3.5") which I planned to layer somehow.

I also wanted to try using a 4x6" photo across two 3x4" pockets. I choose this photo.

Another photo effect I use this week is a Polaroid style print to put in one of the 3x4" pockets.

STEP 2: LAYOUT PHOTOS OVER POCKETS WHERE THEY WILL GO, GRAB CARDS, GRAB EMBELLISHMENTS (30-45 minutes)
I move them around a bit until it just feels right. As I am doing this, I pull cards out of my stash, picking one that catches my eye or that I wanted to use that week, and then picking other ones that may flow well with that card. If I can't find any 2 cards that I want to use. I will dig again and just pick another card to try to match with. I am shooting for one 4x6 title card and 1-2 3x4" cards for journaling and to add pop to the page.

This is my card organizer. It's a mini cube organizer from Michaels.

As you can see, the cards are all mixed in, only separated by their use (pretty/journaling/phrases/etc) not by their color or kit.

I choose some bright enamel, a cork & and a veneer star. I can always add more or change my mind, but I felt that I hadn't used these much in the last few layouts so I pull them from my collection.

STEP 3: STAPLE, GLUE, JOURNAL, ADD FINAL TOUCHES (15-30 minutes)
Having a few key tools will make this step easy and fast and have a nice finish.
Glossy Accents is a glue that dries fast and clear, comes out of a tiny tip and is strong. Great for using on embellishments like veneer and cork and ANYTHING else you want to glue down.
Tim Holtz Tiny Attacher stples these tiny staples that are so cute. Makes attaching sequins and other things fast and easy. I like the stapled look, too.
These pens are the BEST. The sharpie pen is the only thing I use to journal on cards. It writes so dark and beautiful but does not bleed! The other pens I found at Hobby Lobby, and they write over photos perfectly. I can see them well, they write smoothly, and they dry instantly.

These pens include a gold, copper, and silver "Metallic Marker" (comes in a 3 pack) by American Crafts; a white "galaxy marker" by American Crafts; and a black "Sharpie Pen" by Sharpie.


{WEEK 5}
This is the finished product after about 2 hours of planning, printing, and doing. Not too shabby!

Hopefully by showing you my process you can be less intimidated to try new layouts and techniques, and to embellish like crazy without worrying if everything "matches" because it doesn't matter if anything matches!! It will look cool and pretty no matter what you do!


Monday, February 3, 2014

Thirty-One Hang-Up Home Organizer

I love organizing. I organize my drawers, my purse, my house, my closet, and even my paperwork. Something I had yet to organize was the massive amount of information coming and going from Emily's school/activities/friends/LIFE. I needed something that made it easy for ME to remember everything. I am also VERY visual. If I can't see something, I will probably forget about it or put it off until the last minute (or worse). Enter Thirty-One gifts. Never in my life would I thought I would HAPPILY spend hundreds of dollars on BAGS. But I won't get into my obsession with these bags right now. I will just focus on the one item in their fantastic line-up that solved the Emily's never-ending stack of paperwork/how can I remember it ALL dilemma. The solution is the thirty-one hang up home organizer. It is the PERFECT (for me) all-in-one command center for "The Kids." Here is my organizer:


This organizer has 5 main sections. The top left has a strip of fabric that allows you to hang up your calendar of choice. I put our school calender here, and it easily fits the 2 months layout our calendar has. This space is large enough to fit just about any paper flip calendar.

The top right section is a vertical dry-erase see-through pocket that fits 8 1/2" x 11" paper. This is where I created a weekly activity chart for my girls. I could easily edit this and add more children later. This gives me and Emily a good visual for what we are doing each week. I use this space to write in "free time" or "work on personal projects." Sometimes we forget about all the great kits and projects we start, so I use this to remind us both that Emily needs time to work on them. Some projects I designate time to include Little Passports, American Girl crafts, and working in her learning/activity books.


The center section has a couple small pockets you could use for just about anything, and another dry-erase see-through pocket that fits 8 1/2" x 11" paper (horizontal). I used this pocket for the annual school calendar so I have a fast at a glace view of our 1/2 days and no school days.

The bottom left and bottom right sections both have 2 pockets each. You could use these for just about anything you need! Right now I am using the top left pocket for Emily's activities, and the top right pocket for paperwork from Emily's school/classroom. I am not using the bottom pockets; instead I am clipping the monthly lunch menu and the monthly PTA calendar to the front so I can easily see both.


As of now I only have one child in school, but once both girls are in school, I will add tabs n the pockets for each girls activities and classrooms. You could use this for several children by adding multiple tabs in the pockets. The rest of the organizer is great for the district information that would be relevant to multiple children across multiple grades and schools. You can create checklists/chore lists/activity lists to put in the dry-erase see-through pockets that suit your individual needs.

I have this hung in our entry way and use it everyday. The fabric is thick and durable. The fabric cleans easily. It looks so pretty with the rest of the turquoise items in my home. If you want to buy your own Thirty-One Hang-Up Home Organizer visit thirty-one online and find a consultant near you to place an order. I almost forgot to mention, these (like all their products), come in several trendy colors, which change every season. If you see a color you love I recommend you buy it, it may disappear next season!